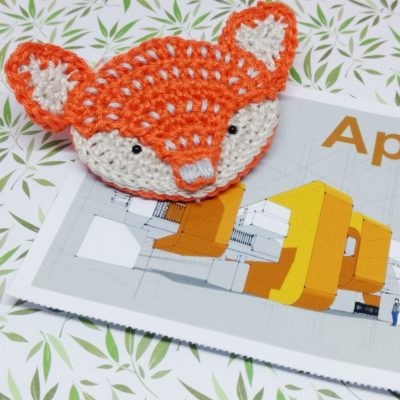
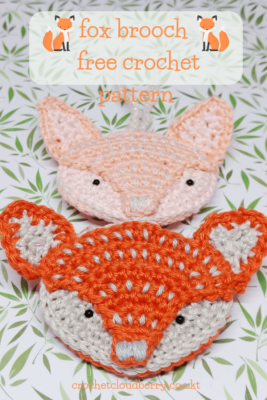
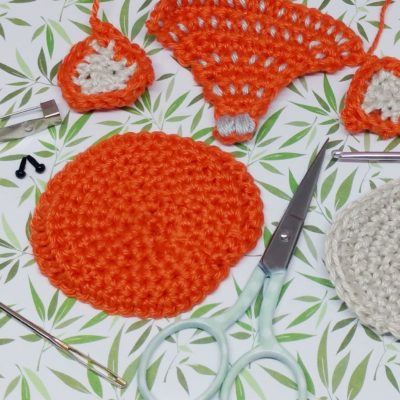
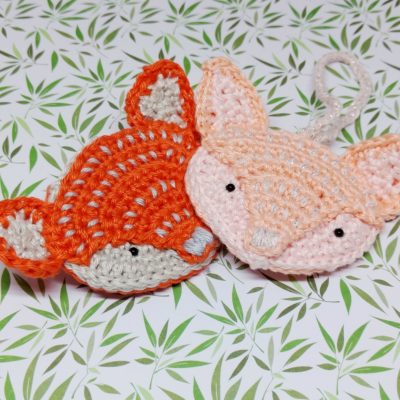
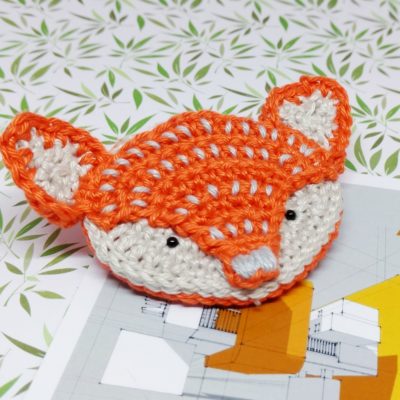
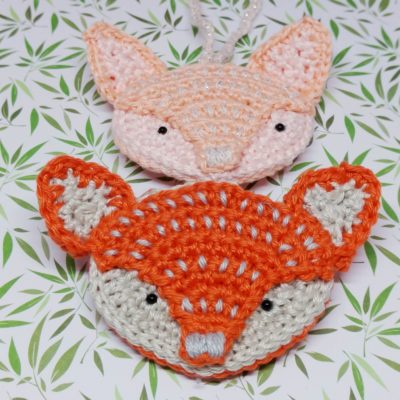
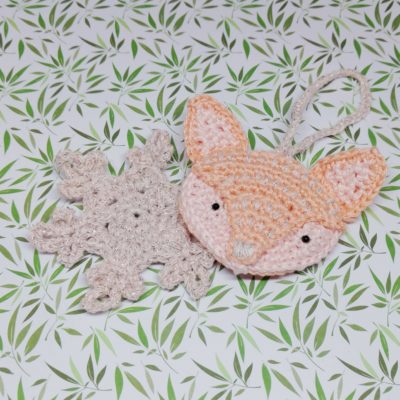
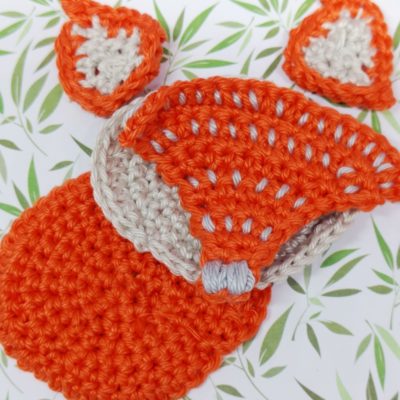
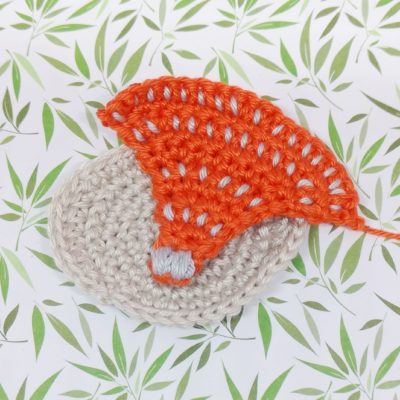
Crochet Fox Head
Crochet foxes – what could be cuter? I am not sure if I can think of anything right now as I have just been absolutely obsessed with these crochet fox faces. I have been thinking about them for a while as I wanted to make some sweet little fox faces as a crochet ornament to hang on my woodland Christmas tree this year. And so I set about designing them in the rose gold colours, I have picked for the bauble collection. But as I was crocheting, I began to wonder what it would look like if I made it in traditional fox colours and used it as a crochet brooch.
(You can find an affordable ad-free version of this pattern in my Etsy store. You will also recieve a black and white imageless pattern that is perfect for printing).


And in fact, it worked in those colours too. I couldn’t decide which one would be best to present on here, so here are the colours and crochet pattern for both the fox head brooch and the fox crochet bauble. As with all my free patterns, you are free to make and sell small quantities but where possible credit Crochet Cloudberry as the designer.
If you like this pattern, sign up to my newsletter to get more patterns like this.
Size
The head is approx. 7cm by 5.5cm

Materials
4 ply cotton in 3 colours. I used Yarn and Colors Must Have Mini in the following shades. (Those in brackets are for the bauble).
- Colour 1 – Birch (Pearl)
- Colour 2 – Sunset (Peach)
- Colour 3 – Soft Grey (Rico- fashion cotton metallise dk – Rose Gold 007)
- 2.5mm crochet hook
- 2 x 3mm safety eyes
- Stuffing
- Brooch finding
- Sewing needle
- Sewing thread
To stay up to date with more free patterns like this sign up to the Crochet Cloudberry newsletter.
Widget not in any sidebars
Pattern notes
The pattern is written using UK terminology, for a conversion chart to US terminology click this link.
Special stiches
Magic circle – mc
Half treble- htr
2 double crochet together (decrease) – 2dctog
[Stitches written in brackets like this are worked into the same stitch.


Instructions
Head
Make 2, 1 in colour 1 and 1 in colour 2.
Join each round with a slip stitch and chain 1 to start each new round. This chain does not count as a stitch.
Foundation: Mc with 6 dc. (6)
Round 1: [2dc] in each stitch around. (12)
Round 2: 1dc, [2dc]. 6 times. (18)
Round 3: 2dc, [2dc]. 6 times. (24)
Round 4: 3dc, [2dc]. 6 times. (30)
Round 5: 4dc, [2dc], 4dc, [2dc], 4htr, [1htr, 1dc]. 2 times. (36)
Round 6: 5dc, [2dc], 5dc, [2htr], 5tr, [2htr]. 2 times. (42)


Nose
Make 1 in colour 2.
At the end of each row, chain 1 to turn. This chain does not count as a stitch.
Foundation. Chain 3.
Row 1: 1dc in second chain from hook, then 1 dc. (2)
Rows 2 -3: Dc across. (2)
Row 4: [2dc], [2dc]. (4)
Row 5: Dc across. (4)
Row 6: 1dc, [2dc], [2dc], dc. (6)
Row 7: Dc across. (6)
Row 8: 1dc, [2dc], 2dc, [2dc], 1dc. (8)
Row 9: 1dc, [2dc], 4dc, [2dc], 1dc. (10)
Row 10: 1dc, [2dc], 6dc, [2dc], 1dc. (12)
Row 11: 1dc, [2dc], 8dc, [2dc], 1dc. (14)
Row 12: 1dc, [2dc], 10dc, [2dc], 1dc. (16)
Row 13: 1dc, [2dc], 5dc, [2dc], [2dc], 5dc, [2dc] 1dc. (20)
Leave a long tail to sew nose on to head and fasten off.


Ears – make 2
At the end of each row, chain 1 to turn. This chain does not count as a stitch.
Part 1
Foundation: With colour 1 chain 5.
Row 1: 1dc in second chain from hook, then 3 dc. (4)
Row 2: 1dc, 2dctog, 1dc. (3)
Row 3: 1dc, 2dctog. (2)
Row 4: 2dctog. Fasten off. (1)
Part 2
Foundation: With colour 2 chain 7.
Row 1: 1dc in second chain from hook, then 5 dc. (6)
Row 2: 2dc. 2dctog, 2dc. (5)
Row 3: 2dctog, 1dc, 2dctog. (3)
Row 4: 1dc, 2dctog. (2)
Row 5: 2dctog. (1)
Do not fasten off yet.
Hold part 1 in front of part 2 and crochet to two parts together. Leave a long tail to sew the ears on to the head and fasten off.


Assembly
Using colour 3, embroider the snout and the freckles onto the nose piece. Then position the nose piece over the head piece in colour 1 and sew into place using colour 2. Position the safety eyes on the head piece and attach.
Using colour 1, slip stich the two head pieces together. I lightly stuffed the bauble but did not stuff the brooch. Tip: It would be neater to start the slip stiches around the area where you will later attach the ears so that you can cover the join.
Using colour 2 sew the two ears in place.
For the brooch, use sewing thread to sew the brooch finding into place at the centre of the back of the head.
For the bauble, you need to make a hanger. Attach colour 3 with a dc in the centre between the ears, chain 40 and then dc into the centre again. Fasten off.
Congratulations, now you have made your very own fox head. If you have enjoyed making this brooch, please tag your project with #CROCHETCLOUDBERRY on facebook or instagram, or add your project to raverly. This pattern has featured in the Oombawka Wednesday links. If you are interested in other cute jewellery, you can check out the directory at FaveCrafts.

YOU MAY ALSO LIKE


11 Comments
Verena
Awww, this is sooo cute. <3
Lots of love !
Verena
Crochet Cloudberry
Thank you Verena! Hope you enjoy crocheting it:)
Julie
Oh my goodness, these are super cute. Pinning for later.
Crochet Cloudberry
Glad you like 😉
Julie
Thank you so much for linking this up at our linky, Handmade Monday 🙂
Crochet Cloudberry
You are welcome, thank you for hosting.
Pingback:
Pingback:
Pingback:
Pingback:
Pingback: